Guide: Rainwater Harvesting System on a Small Structure
In the video titled “Setting Up a Rainwater Harvesting System on a Small Structure,” Joe from Homesteadonomics explores the process of installing a rainwater harvesting system on a shipping container playhouse. Throughout the video, Joe covers various steps, including the installation of gutters, downspout pipes, leaf guards, first flush systems, water tanks, inlet, and overflow pipes. He also discusses important considerations before setting up a rainwater harvesting system and provides contact information for business inquiries. The video covers a range of topics, including DIY, random projects, rainwater harvesting, welding, woodworking, and outdoor activities.
Introduction to Rainwater Harvesting Systems on Small Structures
Rainwater harvesting is the process of collecting and storing rainwater for later use. It is an ancient practice that has gained popularity in recent years due to its numerous benefits. Installing a rainwater harvesting system on a small structure, such as a residential house or a small commercial building, can help conserve water, reduce water costs, and decrease reliance on traditional water sources.
Definition and Benefits of Rainwater Harvesting
Rainwater harvesting involves the collection, filtration, and storage of rainwater for various uses. The collected rainwater can be used for irrigation, toilet flushing, laundry, and even drinking water in some cases. By harnessing rainwater, you can reduce your dependence on municipal water supplies and lower your water bills. Moreover, rainwater is often free from many contaminants found in groundwater and surface water, making it a sustainable and environmentally friendly choice.
Overview of Rainwater Harvesting Systems
Rainwater harvesting systems consist of several components that work together to collect, store, and distribute rainwater. The main components include a catchment area (usually the roof), gutters, downspouts, a storage tank, and a distribution system. Rainwater is collected from the roof through the gutters and downspouts, and then directed into a storage tank. The stored water can be accessed and used when needed through a distribution system, such as a pump or gravity-fed pipes.
Advantages of Setting Up a Rainwater Harvesting System on a Small Structure
Setting up a rainwater harvesting system on a small structure offers several advantages. Firstly, it allows you to utilize a sustainable and renewable water source, thus conserving water and reducing the strain on traditional water supplies. Secondly, it helps lower your water bills by reducing reliance on municipal water. Additionally, rainwater is usually free from many contaminants found in other water sources, making it a safer and healthier option. Lastly, rainwater harvesting systems can contribute to the overall sustainability and resilience of your property and community.
Important Considerations Before Installing a Rainwater Harvesting System
Before installing a rainwater harvesting system on a small structure, there are several important factors to consider. These considerations will help ensure the efficient and effective functioning of the system and maximize its benefits.
Checking Legal Requirements and Regulations
Before installing a rainwater harvesting system, it is crucial to check the legal requirements and regulations in your area. Some regions may have specific guidelines or permits that need to be followed. By familiarizing yourself with the local regulations, you can avoid any legal issues and ensure compliance with the necessary standards.
Determining the Availability of Rainfall
The availability and frequency of rainfall in your region should be assessed before setting up a rainwater harvesting system. If your area experiences infrequent or unpredictable rainfall, the system may not be as effective. However, even in areas with low rainfall, a rainwater harvesting system can still be beneficial for supplementing water supply during rainy seasons or for specific purposes such as irrigation.
Assessing the Quality of the Roofing Surface
The quality and condition of your roof play a critical role in rainwater harvesting. It is important to assess the roofing surface for any contaminants or potential sources of pollution, such as bird droppings, tree sap, or chemical residue. These contaminants can affect the quality of the collected rainwater and may require additional filtration or treatment. Regular maintenance and cleaning of the roof are recommended to ensure optimal water quality.
Calculating the Water Demand and Usage
Before installing a rainwater harvesting system, it is essential to calculate your water demand and usage. This will help determine the appropriate storage capacity of the system. Consider the number of occupants and their water consumption patterns, as well as the intended uses of the harvested rainwater. An accurate estimation of water demand will prevent an undersized or oversized storage tank, ensuring efficient utilization of the harvested rainwater.
Budgeting and Costs of Installation
Setting up a rainwater harvesting system involves initial costs for equipment, installation, and maintenance. It is important to budget and consider the associated costs before proceeding. Research the prices of rainwater harvesting kits, tanks, gutter systems, and any additional components required for your specific setup. Additionally, factor in the costs of installation by professionals, if necessary, and ongoing maintenance expenses.
Assessing Potential Risks and Maintenance
Every system has its own risks and maintenance requirements that should be assessed before installation. Consider potential risks such as overflow due to heavy rainfall, storage tank contamination, or blockage of gutters and downspouts. Plan for regular maintenance activities, such as gutter cleaning, tank inspections, and filter replacements, to ensure the system operates optimally. Being aware of these risks and maintenance needs will help you address them effectively and ensure the longevity of your rainwater harvesting system.

Selecting the Right Rainwater Harvesting Kit
Selecting the right rainwater harvesting kit is crucial for the successful setup and operation of your system. Consider the following factors when choosing a kit.
Understanding the Components of a Rainwater Harvesting Kit
Rainwater harvesting kits come with various components that make up the entire system. These components include gutters, downspouts, filters, pumps, tanks, and distribution systems. Understanding the different parts and their functions will help you choose the right kit for your specific requirements.
Evaluating the Capacity and Size of the Kit
The capacity and size of the rainwater harvesting kit should align with your water demand and usage. Consider the volume of rainfall in your area, the size of your catchment area (roof), and your estimated water consumption. The kit should have an adequate storage tank capacity to meet your needs without requiring constant refilling or causing overflowing issues.
Considering the Color and Aesthetics
Rainwater harvesting kits come in various colors and designs. It is important to consider the aesthetic aspect, especially if the system is visible from the exterior or if it is installed in a residential setting. Choose a kit that complements the architectural style and surroundings of the small structure, ensuring a visually pleasing result.
Reviewing the Durability and Material of the Kit
The durability and material of the rainwater harvesting kit are essential considerations, as they will determine the longevity and maintenance requirements of the system. Look for kits made from high-quality materials that are resistant to corrosion, UV radiation, and other environmental factors. This will ensure the longevity of the system and reduce the need for frequent repairs or replacements.
Determining the Intended Use of the Water
Before setting up a rainwater harvesting system, consider the intended use of the collected rainwater. Different uses require different levels of water quality and treatment. Determining the purpose of the harvested rainwater will help you choose the appropriate filtration and treatment methods, as well as determine the required storage capacity.
Identifying the Purpose of Harvested Rainwater
Rainwater can be used for various purposes, including irrigation, toilet flushing, laundry, and even drinking water. Each purpose has different requirements in terms of water quality and treatment. For example, water used for irrigation or toilet flushing may not require extensive filtration, while water intended for drinking should undergo thorough treatment to ensure its safety.
Matching the Water Quality Requirements with the Intended Use
Different uses of rainwater have varying quality requirements. Water used for non-potable purposes, such as irrigation or toilet flushing, may not need extensive treatment. However, if the water is intended for potable uses, such as drinking or cooking, it should undergo filtration and disinfection to meet drinking water standards. Consider the water quality requirements of your intended use and choose appropriate treatment methods and components accordingly.
Calculating the Required Storage Capacity
The storage capacity of your rainwater harvesting system should align with your intended use and water demand. Calculate the average daily water consumption for your intended purpose and determine the storage capacity accordingly. Ensure that the storage tank has sufficient volume to meet your needs, even during dry spells or periods of low rainfall. Having a well-sized storage tank will ensure a consistent supply of rainwater throughout the year.
:max_bytes(150000):strip_icc()/rainwater-harvesting-system-isometric-diagram-1201105579-34cb7b27492f42c387b89fd903a16ba4.jpg "Setting Up a Rainwater Harvesting System on a Small Structure")
Choosing the Suitable Roofing Surface
The roofing surface of your small structure is the primary catchment area for rainwater. Choosing the suitable roofing material and assessing its characteristics are essential for effective rainwater harvesting.
Evaluating Different Roofing Materials
Different roofing materials have varying characteristics that can affect rainwater harvesting. Consider the porosity, surface smoothness, and vulnerability to contamination of the roofing material. Non-porous and smooth surfaces, such as metal or glazed tiles, are recommended as they facilitate the efficient flow of rainwater and minimize the risk of contamination.
Assessing the Slope and Drainage Characteristics
The slope and drainage characteristics of your roof can impact the collection and flow of rainwater. A moderate slope is desirable to allow rainwater to flow smoothly towards the gutters. Avoid flat roofs or roofs with excessive slopes, as they can result in poor water collection and potential overflow issues. Ensure that the gutters and downspouts are correctly sized and located to accommodate the roof’s drainage characteristics.
Considering the Contamination Risks and Maintenance
Roofs can be susceptible to various contaminants that can affect the quality of collected rainwater. Assess the potential sources of contamination, such as nearby trees, bird roosts, or air pollution. Regular maintenance of the roof, including cleaning gutters, removing debris, and inspecting for potential contaminants, is crucial to maintain water quality and ensure the efficient functioning of the rainwater harvesting system.
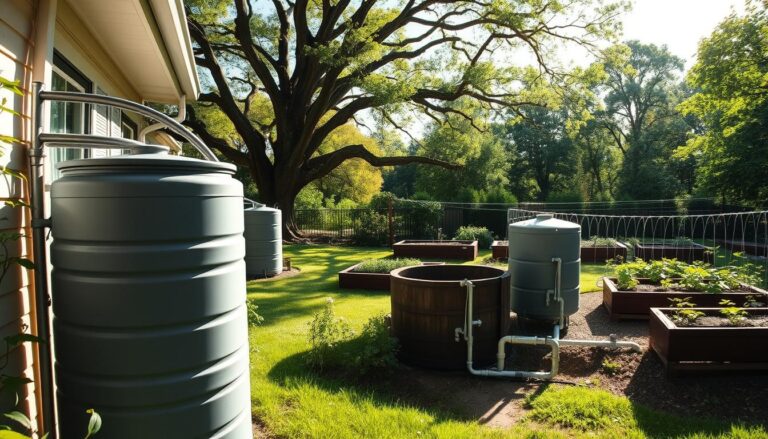
Selecting the Ideal Location for the Water Tank
Choosing the ideal location for the water tank is essential to maximize space utilization, accessibility, and aesthetics. Consider the following factors when determining the tank’s placement.
Evaluating the Space Constraints and Available Area
Assess the available space on your small structure for tank placement. Consider the size and shape of the tank, as well as any necessary clearance requirements. It is important to prioritize safety and accessibility when selecting a location, ensuring that the tank does not obstruct walkways, entrances, or emergency exits. If space is limited, consider installing multiple smaller tanks or exploring underground tank options.
Assessing the Accessibility for Maintenance
Regular maintenance and inspection are essential for the longevity and proper functioning of the water tank. Choose a location that facilitates easy access for cleaning, inspection, and repairs. Additionally, ensure that the tank can be easily refilled, either through a direct connection to the downspout or with the use of a pump, depending on the system design.
Considering the Aesthetics and Visual Impact
The location of the water tank can have a significant impact on the overall aesthetics of your small structure. Consider the visual impact of the tank and its placement on the exterior appearance. Depending on your preferences and the design of the structure, you can choose to install the tank in a hidden or discreet location, or you can embrace its presence and incorporate it into the architectural design.
Preparing the Foundation for the Water Tank
The foundation of the water tank is crucial for its stability and longevity. Consider the following steps when preparing the foundation.
Determining the Type of Foundation Required
The type of foundation required for the water tank will depend on various factors, such as the size and weight of the tank, the local soil conditions, and any specific engineering requirements. Consult a professional or refer to the manufacturer’s guidelines to determine the appropriate foundation type, whether it is a concrete slab, compacted gravel bed, or specialized tank support system.
Preparing the Ground and Ensuring Stability
Before laying the foundation, prepare the ground by removing any vegetation, rocks, or debris. Ensure that the ground is level and compacted to provide a stable base for the tank. Consider using a geotextile membrane to prevent soil erosion and provide additional stability. Proper ground preparation will prevent uneven settling or shifting of the tank over time.
Installing Necessary Supports or Brackets
Depending on the tank design and specifications, additional supports or brackets may be required for stability and safety. Follow the manufacturer’s instructions for installing the necessary supports or brackets on the foundation. Ensure that they are securely attached and capable of withstanding the weight of the full tank, as well as any external forces such as wind or seismic activity.
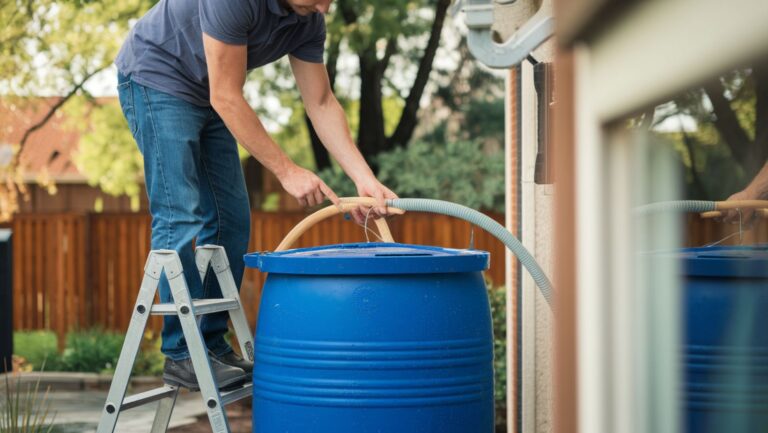
Installing Gutters on the Small Structure
Gutters are an essential component of a rainwater harvesting system as they collect and channel rainwater from the roof to the downspouts and ultimately into the storage tank. Follow these steps to install gutters properly.
Understanding the Function and Importance of Gutters
Gutters play a vital role in collecting and diverting rainwater from the roof towards the downspouts. They prevent water from cascading down the sides of the structure, minimizing soil erosion and water pooling around the foundation. Gutters also protect the integrity of the roof by preventing excessive water runoff, which can lead to roof leaks and structural damage.
Measuring and Marking the Gutter Placement
Measure the length of each roof edge that requires a gutter and mark the placement accordingly. Use a chalk line or a laser level to ensure a straight and level installation. Consider the necessary slope for efficient water flow towards the downspouts. The ideal slope is typically 1/16 to 1/8 inch per foot of gutter length.
Installing the Gutters Properly
Start by attaching the gutter hangers or brackets to the fascia board of the small structure at appropriate intervals. These hangers will support the weight of the gutter. Install the gutter sections by sliding the gutter into the hangers and securing them with screws or rivets. Ensure that the gutters are level and have the necessary slope towards the downspouts.
Sealing and Securing the Gutter Joints
Properly seal the joints between gutter sections to prevent water leakage. Apply gutter sealant or silicone caulk to the joints, ensuring a watertight connection. Use a sealant compatible with the gutter material, such as aluminum or PVC. Additionally, reinforce the joints with pop rivets or screws for added stability and strength.
Adding End Caps and Outlet Components
To complete the gutter installation, add end caps to the gutter sections to prevent water from escaping. Attach the end caps securely with screws or rivets. Install the outlet components where the downspouts will connect to the gutters. These components provide a connection point for the downspout and facilitate the proper flow of rainwater from the gutter to the downspout.
Running Downspout Pipes from the Gutters
Downspout pipes are crucial for directing rainwater from the gutters to the storage tank. Proper installation of downspout pipes will ensure the efficient and unobstructed flow of rainwater.
Choosing the Proper Downspout Size and Material
Select downspout pipes with an appropriate size and material for your rainwater harvesting system. The size of the downspout should correspond to the expected volume of rainwater flow and the available gutter size. Downspout materials can vary, including PVC, aluminum, or galvanized steel. Choose a material that is durable, corrosion-resistant, and compatible with the gutter and tank system.
Establishing the Downspout Placement
Plan the placement and number of downspout pipes throughout the system. Ensure that the downspouts are strategically located to maximize rainwater collection efficiency and minimize any undue strain on the gutter system. Consider the slope and layout of the structure and aim for an even distribution of downspouts to prevent overload or overflow issues.
Installing the Downspout Pipes
Cut the downspout pipes to the required length using aviation snips or a hacksaw. Attach the downspout elbows, bends, and extensions as necessary to direct the rainwater flow towards the storage tank. Secure the downspout pipes to the wall or structure using pipe straps or brackets, maintaining a proper alignment and angle for efficient and unobstructed water flow.
Installing Leaf Guards to Prevent Debris
Leaf guards are essential accessories that prevent debris, such as leaves, twigs, or small animals, from entering the rainwater harvesting system. Proper installation of leaf guards will minimize the risk of clogging and ensure the optimal functioning of the system.
Understanding the Importance of Leaf Guards
Leaf guards act as a protective barrier between the gutters and downspouts, preventing debris from entering the system. By keeping the rainwater clean and free from contaminants, leaf guards minimize the need for frequent cleaning and maintenance. They also prevent clogged gutters, which can lead to overflow, water damage, and compromised water quality.
Selecting the Right Leaf Guard Type
Various leaf guard types are available, including mesh screens, gutter covers, and foam inserts. Consider the characteristics of the surrounding vegetation, the level of rainfall, and the maintenance requirements when choosing a leaf guard type. Mesh screens or gutter covers are commonly used options as they effectively filter out debris while allowing water to pass through.
Installing the Leaf Guards
Install the leaf guards by attaching them to the gutters or directly beneath the downspout openings. Follow the manufacturer’s instructions for the specific leaf guard type. Ensure that the leaf guards fit securely and tightly to avoid any gaps or openings that may allow debris to enter the system. Regularly inspect and clean the leaf guards to maintain their effectiveness and prevent clogging.

Installing a First Flush System
A first flush system is an important component of a rainwater harvesting system as it helps remove contaminants and improve the water quality. Follow these steps to install a first flush system.
Understanding the Function of a First Flush System
A first flush system is designed to eliminate the initial runoff from the roof, which carries the most pollutants and contaminants. It works by diverting the initial dirty rainwater away from the storage tank and downspouts, allowing cleaner water to enter the system. By removing debris, pollutants, and contaminants, a first flush system helps maintain the quality of the harvested rainwater.
Selecting a Suitable First Flush System
There are different types of first flush systems available, including passive and active systems. Passive systems use a ball and seat mechanism or a vertical standpipe to divert the initial runoff, while active systems use automatic valves or mechanical devices to perform the same function. Choose a first flush system that suits your specific needs, taking into account the size of the catchment area, anticipated debris load, and maintenance requirements.
Installing the First Flush System
Install the first flush system components according to the manufacturer’s instructions. Typically, the first flush system is installed at the downspout outlet or at a specific location along the gutter line. Ensure that the diversion device or mechanism is correctly positioned to allow the initial polluted runoff to be diverted away from the storage tank. Regularly clean and maintain the first flush system to prevent clogging or malfunctioning.
Adding a High Water Level Overflow Kit
An overflow kit is an important safety feature of a rainwater harvesting system that prevents overflow and potential water damage. Follow these steps to install a high water level overflow kit.
Understanding the Need for an Overflow Kit
An overflow kit ensures that excess rainwater does not cause the storage tank to overflow, resulting in water damage or flooding. It provides a secondary outlet for the water in case the primary outlet becomes blocked or the storage tank reaches its capacity. An overflow kit helps protect the structural integrity of the small structure and prevents water pooling or erosion in the surrounding areas.
Selecting a Suitable Overflow Kit
There are various types of overflow kits available, including gravity-fed overflow pipes, overflow outlets, or automated overflow devices. Choose an overflow kit that suits your specific requirements and system design. Consider factors such as the volume of rainwater expected, the storage tank capacity, and the desired overflow location. Ensure that the overflow kit is compatible with the other components of the rainwater harvesting system.
Installing the High Water Level Overflow Kit
Install the high water level overflow kit in a location that allows safe and efficient drainage of excess rainwater. Typically, the overflow kit is installed at or near the top of the storage tank. Follow the manufacturer’s instructions for the specific kit to ensure proper installation and alignment. Regularly inspect the overflow kit to ensure it is free from any blockages or obstructions that may impede water flow.
Installing a Water Level Gauge
A water level gauge is a useful tool that allows you to monitor the amount of water in the storage tank. Installing a water level gauge will help you track your water usage, estimate the available water supply, and ensure efficient management of the rainwater harvesting system.
Understanding the Importance of a Water Level Gauge
A water level gauge provides a visual indication of the amount of water in the storage tank. It helps you track your water usage, detect any abnormalities or leaks in the system, and plan for potential water shortages or additional storage requirements. By keeping track of the water level, you can ensure the optimal utilization of the available rainwater and avoid any potential overflow or underutilization issues.
Selecting an Appropriate Water Level Gauge
Water level gauges come in various types, including dipstick gauges, sight tube gauges, or electronic monitoring systems. Choose a water level gauge that suits your preferences and requirements. Consider factors such as accuracy, ease of use, reliability, and compatibility with the storage tank. Opt for a gauge that provides clear and easy-to-read measurements and can withstand the environmental conditions of your location.
Installing the Water Level Gauge
Install the water level gauge at a convenient location near the storage tank or in an easily accessible area. Follow the manufacturer’s instructions for the specific gauge model to ensure proper installation and calibration. Regularly inspect and maintain the water level gauge to ensure accurate readings and efficient performance.
Conclusion
Setting up a rainwater harvesting system on a small structure offers numerous benefits, including water conservation, cost savings, and reduced reliance on traditional water sources. By following the steps outlined in this article, you can successfully install and maintain a rainwater harvesting system that suits your specific requirements and objectives. Remember to consider the legal requirements, assess the availability of rainfall, choose the right components, determine the intended use of the water, and ensure proper installation and maintenance. Embracing rainwater harvesting promotes sustainability, resilience, and a greener future for your small structure and the environment.