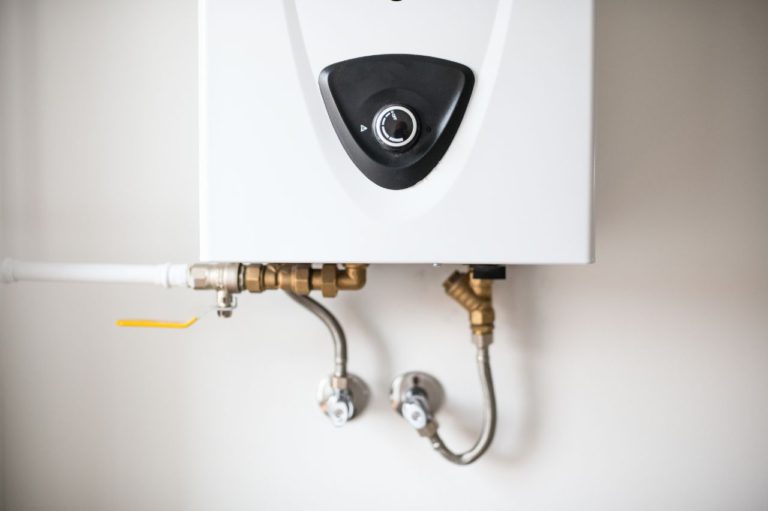
How to Install a Tankless Gas Water Heater
Installing a tankless gas water heater can be a cost-effective and energy-efficient way to provide hot water for your home. With this type of water heater, you only heat the water when you need it, which can lead to significant savings on your heating bill.
However, it’s important to note that the installation process for a tankless water heater involves following local building codes and safety considerations, so it’s best to have a licensed professional plumber handle the job.
The installation process includes turning off the gas and water supply, draining the tank, disconnecting the gas, water, and exhaust vent, finding an appropriate location for venting outside, installing hot and cold copper lines, pressure relief valve, tank, and drain line, cutting holes for the vent pipe, burping the pipes, and finally, plugging in the power and opening the gas valve.
Following these steps and any additional guidelines provided by the manufacturer or local plumbing inspector will ensure that your tankless water heater is installed correctly and ready to provide you with unlimited hot water and savings in no time.
Step 1: Turn off Gas and Water, Drain Tank
Turn off the gas supply
Before you begin the process of installing a tankless gas water heater, it is crucial to turn off the gas supply to ensure your safety. Locate the gas shut-off valve, which is usually located near the gas meter or on the gas pipe leading to the water heater. Turn the valve to the “off” position, which will stop the flow of gas to the water heater.
Turn off the water supply
Next, you’ll need to turn off the water supply to the old water heater. Locate the main water shut-off valve, which is typically situated near the water meter. Turn the valve to the “off” position to stop the water flow.
Attach a hose to the drain to empty the tank
To drain the water from the old tank, you’ll need to attach a hose to the drain valve located at the bottom of the tank. Place the other end of the hose in a location where the water can safely drain, such as a floor drain or outdoor area. Open the drain valve and allow the water to flow until the tank is empty.
Step 2: Disconnect Gas, Water and Exhaust Vent, Remove Tank
Disconnect the gas line
Now that the tank is empty, it’s time to disconnect the gas line from the old water heater. This step requires caution, as you’ll be working with gas. Use a wrench to loosen the connection between the gas line and the water heater. Once the connection is loose, carefully detach the gas line from the heater.
Disconnect the water lines
Similarly, you’ll need to disconnect the water lines that supply the old tank. Using a wrench, loosen the connections where the water lines are attached to the water heater. Once the connections are loose, carefully remove the water lines.
Disconnect the exhaust vent
The exhaust vent is responsible for removing the byproducts of combustion from the water heater. Locate the connection between the vent pipe and the water heater and use a screwdriver or a wrench to disconnect it. Carefully remove the exhaust vent from the old water heater.
Remove the old tank
With all the connections detached, you can now remove the old tank from its position. Depending on the size and weight of the tank, you may need assistance to safely remove it. Take care to avoid damaging any surrounding structures or causing injury.

Step 3: Find Location Venting Outside
Choose a location for the new tankless water heater
Now that you’ve removed the old tank, it’s time to decide where to install the new tankless water heater. Consider factors such as proximity to the gas and water supply lines, accessibility for maintenance, and energy efficiency. You may want to consult a professional plumber for guidance if you’re unsure about the best location.
Ensure the location allows for proper venting to the outside
Proper ventilation is crucial for a tankless gas water heater to function safely and efficiently. Ensure that the chosen location allows for a vent pipe to be installed and connected to the outside. Ventilation requirements may vary depending on the specific model and local building codes, so it’s essential to follow the manufacturer’s instructions and consult a professional if needed.
Step 4: Install Hot and Cold Copper Lines
Connect the new copper piping for the hot and cold water lines
To supply hot and cold water to the tankless water heater, you’ll need to install new copper piping. Measure and cut the copper pipes according to the dimensions needed for your specific installation. Use a pipe cutter or a hacksaw to make clean, straight cuts. Then, connect the pipes to the appropriate fittings for the hot and cold water lines.
Use threaded fittings, soldered joints, or crimped connections
Depending on your level of plumbing expertise and the specific requirements of your tankless water heater, you can choose between threaded fittings, soldered joints, or crimped connections to secure the copper pipes. Follow the manufacturer’s instructions and consult a professional plumber if you’re uncertain about the most suitable method for your installation.

Step 5: Install Pressure Relief Valve, Tank and Drain Line
Install a temperature and pressure relief valve
A temperature and pressure relief valve is a vital safety feature of a tankless gas water heater. It is designed to prevent excessive pressure and temperature buildup within the unit. Follow the manufacturer’s instructions to install the valve correctly. Be sure to connect the discharge pipe to direct any water released by the valve away from the unit.
Install an expansion tank
In some cases, an expansion tank may be necessary to accommodate the thermal expansion that occurs when water heats up. This helps to prolong the lifespan of the tankless water heater and prevent damage to the plumbing system. Consult the manufacturer’s instructions to determine if an expansion tank is required for your specific installation and install it accordingly.
Install a condensate drain line
Tankless gas water heaters produce condensate as a result of the combustion process. It’s important to install a condensate drain line to safely dispose of this wastewater. Consult the manufacturer’s instructions to determine the appropriate location for the drain line and ensure that it is properly connected to a suitable drainage system.
Step 6: Cut Hole and Connect Vent Pipe
Cut a hole for the vent pipe
To vent the byproducts of combustion to the outside, you’ll need to cut a hole in an exterior wall or roof for the vent pipe. Measure and mark the location where the hole will be cut. Use a hole saw of the desired diameter to create a clean opening in the chosen spot. Take care to follow all safety precautions and wear appropriate protective gear during this step.
Use a hole saw for the desired size
A hole saw is a specialized tool designed for cutting holes in various materials. Select a hole saw that matches the diameter specified by the manufacturer for the vent pipe. Attach the hole saw to a drill and carefully cut through the wall or roof following the marked guidelines.
Connect the PVC or plastic vent pipes using approved cleaner and glue
After the hole is cut, connect the PVC or plastic vent pipes to complete the venting system for the tankless water heater. Use an approved cleaner to prep the ends of the pipes and then apply appropriate glue or cement to create a secure and airtight connection. Follow the manufacturer’s instructions for the specific adhesive to use.
Step 7: Burp Pipes, Plug in Power, Open Gas Valve
Turn on the water supply and open a hot water faucet to remove air from the pipes
Now that the majority of the installation is complete, it’s time to burp the pipes and remove any trapped air. Turn on the water supply slowly, allowing water to flow through the pipes. Open a nearby hot water faucet to allow air to escape. Once a steady stream of water flows from the faucet, you can close it.
Shut off the faucet
After ensuring that all the air has been purged from the system, shut off the hot water faucet that was opened during the burping process. This will prevent water from continuously flowing.
Plug in the power cord of the tankless water heater
The tankless gas water heater requires a power source to operate. Plug in the power cord into a nearby electrical outlet. Ensure that the power supply meets the voltage requirements specified by the manufacturer.
Open the gas valve
Finally, open the gas valve to supply gas to the tankless water heater. Take care to follow the manufacturer’s instructions on how to safely open the valve. Allow a few moments for the gas to reach the unit and make sure there are no gas leaks before proceeding.
Step 8: Follow Manufacturer’s and Local Plumbing Inspector’s Instructions
Follow any additional installation procedures specified by the manufacturer
To ensure proper functioning and warranty compliance, it is crucial to follow all additional installation procedures specified by the manufacturer. Pay close attention to details such as gas pressure settings, maintenance requirements, and any additional components or accessories that may need to be installed.
Comply with local plumbing codes and regulations
Local plumbing codes and regulations exist to maintain safety standards and ensure proper installations. It is important to comply with these regulations when installing a tankless gas water heater. Familiarize yourself with the specific codes and regulations in your area and ensure that your installation meets the required standards. If you have any doubts, consult a professional plumber or contact your local plumbing inspector for guidance.
Conclusion
Congratulations! You have successfully installed your new tankless gas water heater. With your new system in place, you can now enjoy unlimited hot water and cost savings. Remember to follow the manufacturer’s instructions for regular maintenance and seek professional help if you encounter any issues. Cheers to a more energy-efficient and convenient hot water supply!